How to Repair Speaker Surround Foam
Foam Surround Replacement Kit Instructions
Below are step-by-step instructions on speaker re-foaming using a Parts Express Speaker Repair Kit. It is highly recommended that you completely read through the instructions before beginning.
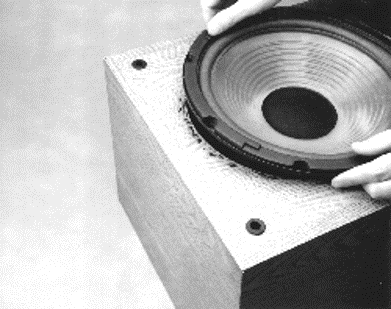
Step 1: Remove from Cabinet
Select the proper screwdriver and remove woofer from the cabinet. Take special care not to puncture the cone when removing the screws. Before disconnecting the wires, observe the polarity of each wire and label them if necessary. It is very important to re-connect the wires with the correct polarity.
Step 2: Remove Gasket Material
If there is no front-mounted gasket, proceed to Step 3.
If the speaker is equipped with a cork or paper gasket, it must be removed. Carefully insert a sharp utility knife between the gasket and the old surround or basket. Slowly work your way around the basket; try to get the gasket off in one piece. The glue seam may brake releasing the gasket, or it may have to be cut off completely. If the gasket becomes delaminated during disassembly, you can repair it with the enclosed glue after removal. The gasket often serves no real purpose if the woofer is front-mounted to the cabinet, so it does not absolutely have to be re-mounted.

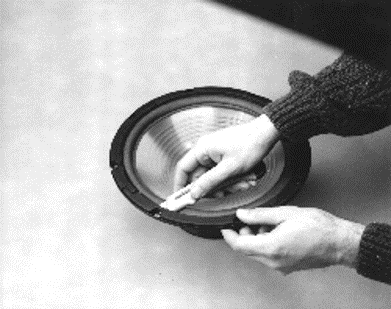
Step 3: Remove the Old Foam from Basket
Carefully remove the old foam by scraping with a utility knife around the basket. 100-grit sandpaper can also help remove the old adhesive and gasket remnants from the metal basket. Create as smooth a surface as possible, then wipe the entire basket rim clean with a rag moistened in isopropyl alcohol.
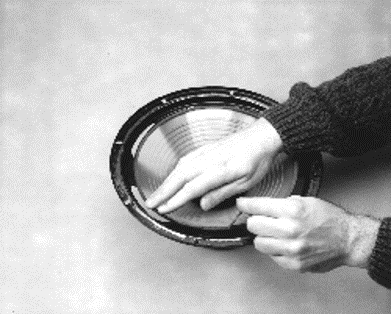
Step 4: Remove the Old Foam from the Cone
Pull the old foam from the cone, making sure not to damage the cone. Use your fingers to rub off the remaining foam particles from the cone's edge. Remove as much foam as you can, but leaving a thin layer is acceptable. Sandpaper can also be used to remove and smooth some of the old adhesive.

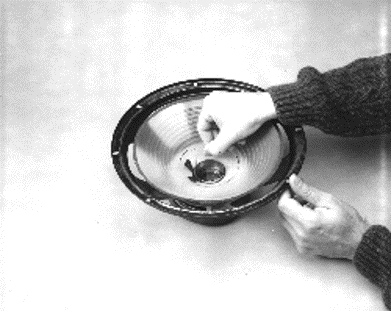
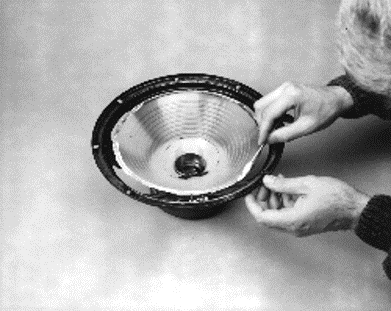
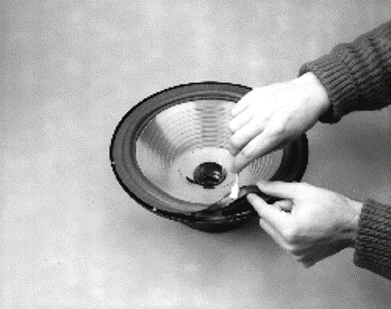
Step 5: Dust Cap Removal/Voice Coil Alignment
(NOT FOR BOSE 901/802!)
Note: Skipping steps 5 and 6 is the most common cause of problems once re-foaming is completed.
With a sharp utility knife, slowly cut an "X" into the center of the dust cap and peel it back. Then carefully cut around the edge of the cap taking care not to cut the lead wires or into the speaker cone. Leaving the ridge of old adhesive around the cone is acceptable. It is best when it is entirely concealed by the new dust cap. Be careful to avoid allowing dust and debris into the internal area of the woofer while the dust cap off.
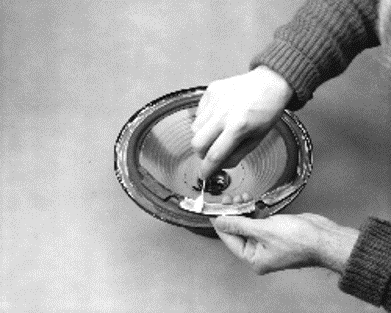
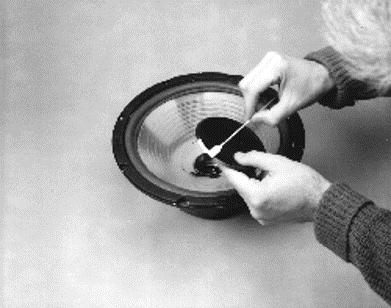
Step 6: Align Assembly
(NOT FOR BOSE 901/802!)
Insert three voice coil shims lengthwise into the space between the voice coil former and the center metal pole piece. Space the shims at 12, 4 and 8 o'clock positions (120 degrees apart).
Note: These shims help maintain proper voice coil alignment with the center pole piece while installing the new foam surround. If the shims are too wide, you can cut them lengthwise with a pair of scissors until all three can be inserted. All three shims must be the same width to center the voice coil former around the pole piece.
Step 7: Glue Surround to Cone
Included in this kit are two pairs of foam surrounds of slightly different style (6-1/2" & 15" kit include only one pair). One pair of surrounds will have a downward angle on the inside flat area, to the bottom of which the adhesive will be applied. Test fit both types; choose the foam surround pair that provides the most mating surface area, cone to surround. If the original surround was attached to the rear of the cone, simply push the surround over cone to test fit.
Apply a moderate amount of glue to the cone edge and spread evenly with a foam swab. Now apply a thin coat of glue to the mating edge of the foam surround and spread evenly. Allow surfaces to cure for approximately 5 minutes or until they become tacky. Lightly place the new foam on the cone, matching the glued surfaces and making certain the surround is centered on the cone. With the alignment shims in place, you can draw the cone upward a bit so that the surround rests entirely upon the cone. Press around the cone edge to force out any excess glue and to smooth out ripples or bumps. Take your time and work slowly to achieve the best results. Ensure that the adhesive has cured sufficiently before proceeding.
Note: The adhesive supplied with the kit does not adhere as well to polypropylene cone materials as it does paper. A gel super glue (thick cyanoacrylate, CA+ ) should be substituted; it is available at any hardware store. Standard super glue is water-thin, and can easily run into the internal area of the woofer with predictable results. Be certain to purchase only the thick or gel CA glue.
Step 8: Glue Surround Edge to Basket
Apply a thin coating of glue to the bottom of the surround edge, and a moderate amount to the frame surface. Evenly spread both surfaces with a uniform, thin coat using a foam swab. Allow glue to cure for approximately 5 minutes. Gently and evenly work the cone/surround downward until the outer edge of the surround contacts the glue and basket. Lightly press down on the outer edge of the foam surround and work around to gently force out any excess glue. Allow the glue to cure sufficiently before proceeding.
Step 9: Reattach Gasket
(NOT FOR BOSE 901/802!)
Clean off old glue from gasket and create a flat, smooth surface. Apply a thin layer of glue to the gasket and top of surround. Spread evenly with a foam swab and allow it to cure for approximately 5 minutes. Refit the gasket material. Turn speaker over (gasket side down) and press on table to bond gasket to basket/surround assembly. It can be left in this position to cure, or clothes pins can be used to assure the gasket is in place. Allow to cure thoroughly before proceeding to Step Ten.
Step 10: Reattach Dust Cap
(NOT FOR BOSE 901/802!)
Carefully remove the three voice coil shims. Using a foam swab, apply a thin layer of glue to the rim of the dust cap. Center and gently place the dust cap over the voice coil. If you're installing the poly dust cap, use a gel type super glue for this as well. Paper and poly dust caps are available in a variety of sizes if your woofers require one larger or smaller than came with the kit. The caps included in the kit are average for the size speaker the kit was intended for.